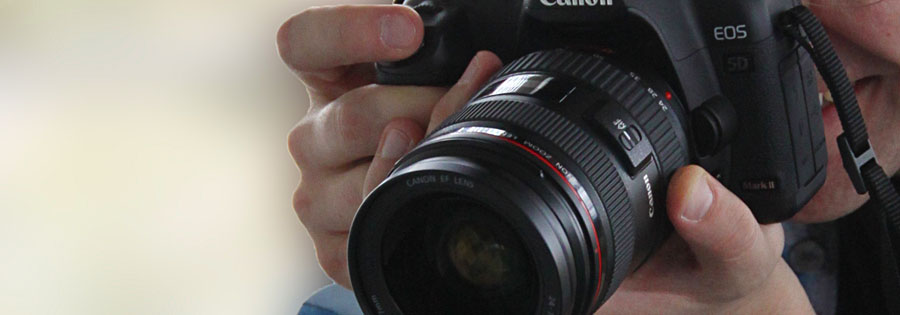
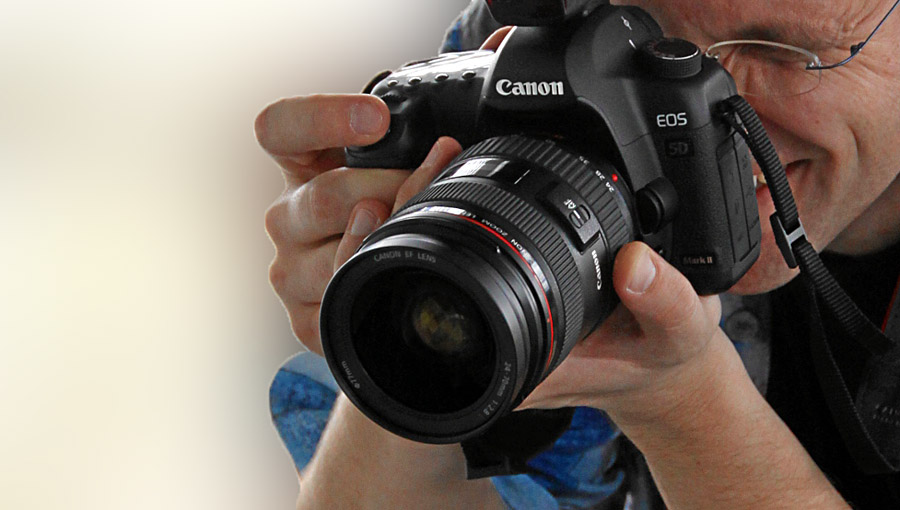
Right posture of the camera
- Camera:
- Canon EOS 50D
- Aperture:
- f/5
- Exposure:
- 1/100 Sek.
- ISO:
- 800
- Focal length:
- 63 mm
Improve your photos with the right posture of your camera
Very often I see people doing wrong postures with the camera. Taking the wrong stance highly increases the possibility for bad or blurred photos. Because of that I made this extensive chapter about the correct posture of the camera, posture and stance of the photographer and tipps to achieve better photos.
Blurred photos have several reasons:
- the photographer is too wiggly while taking the photo
- the motive is moving too fast (which I will later in depth discuss in the chapter about exposure times.)
Let us look at it step by step to see, which sources of error appear and how we can avoid them.
Blurred photos
A special sort of sport in the holidays can be to watch people taking photos. There are some diverse types of photographers.
Everything is okay with the left (resp. One hand must be enough)
 Posture of the camera: the one-armed bandit
Looking cool while photographing is much more important than the later result. The camera is held casual with one arm.
The more south the holiday is, the more helps the sun that acceptable photos are created with this technique. However, a vacation in the north, or photos in the evening or while it is raining should be avoided by people using these techniques.
 Always use both hands while handling the camera.
There is already an improvement, when you take pictures with both hands.
 with one hand") Type of photographer the athlete: Using a Single Lens Reflex Camera (SLR) with one hand
Type of photographer the athlete: Using a Single Lens Reflex Camera (SLR) with one handInteresting is, that not only small compact cameras are held with one hand but also massive Single Lens Reflex Cameras (SLR).
And the weight is the problem. The weight, which supports in regular postures the steadiness of the camera, becomes quite heavy if used one handed and the photographer can barely keep it steady.
 Holding a SLR with 2 hands, but it is still suboptimal
Always handle the camera with both hands – whereupon in the following picture the posture is far from perfect.
The big displays of the cameras, which show the picture before actually taking it, lure photographers towards not looking through the finder. Not by looking through the finder the camera becomes steadier, but because of the stabilization due to the forehead of the photographer. By using this technique, the camera gains another old point additionally to the hands.
The right stand while photographing
A good photographer always cares about standing stable.
In the picture above the model is standing (foreground) more stable than the photographer.
Even if you want to make a particular photo from another perspective, you should always care about a solid stand. Otherwise, the possibility increases that the photo becomes blurred.
The best would be to carry a folding ladder around.
For a stable stand both feet should be standing flat on the ground (High heels can be a difficulty). Gain additional steadiness by setting one food slightly forward and taking a broad position.
Right posture holding a camera
- Camera:
- Canon EOS 50D
- Aperture:
- f/5
- Exposure:
- 1/100 Sek.
- ISO:
- 800
- Focal distance:
- 63 mm
8-point list for sharp and clean photos.
Right posture of the hands, to avoid getting blurred photos
- The right hand is holding the camera at the handle (which should fit to the own hand size)
- with the left hand the objective should be supported.
- two fingers of the left hand adjust the zoom of the objective.
- press the camera against your forehead while taking an intense look through the finder, even if in some cases your glasses are disturbing you. (Please don’t break these!)
- the arms and elbows press against the torso.
Feet and the stand
- for a safe stand, stand broadly and set one foot slightly forward.
- if you have the possibility to lean against something steady – do it! The more stable your posture is, the sharper and cleaner your pictures will become. (Look further down, to see how you can use chairs for your support.
How to avoid blasting your photos when pulling the trigger
- the finger which pulls the trigger should rest loose on the trigger and should use as least power as necessary to pull it! Do this motion slowly, carefully and just with the knuckle. Otherwise there is the risk of blurring the picture in exactly the moment of pushing the trigger.
As the next step you should be aware of your own breathing! Like snipers mind the process of exhaling and inhaling and analyze when your body is calmest. It differs from human to human, if it is while or after exhaling or inhaling.
Some say to hold one/‘s breath is the moment, where the body is calmest. But if you forget to breath over longer periods of time it is a reason to worry! So, do not totally forget about breathing. A photographer, who becomes bluer and bluer till he faints and hits the floor is mostly not the result you want to achieve.
Photographers can look stupid
And always remember – it is totally irrelevant, how stupid the photographer looks while taking the pictures – this cannot be seen on the finished pictures!
Some acrobatic twisting can cause amusement of the photographed person, which can lead to beautiful pictures.
Tips for sharp photos: avoid “camera shake” with tools
A good tripod (with that I do not mean the cheap 9,95 $ tripods, which fall over when you glance at them once) is worth its weight in gold in difficult light situations. Unfortunately, often when you want to take a picture in a difficult light situation the tripod is somewhere else.
That/‘s the time to get creative and find other possibilities. For example a back of a char is perfect for stabilizing your arms.
And if you want to shoot a photo from a lower point of view, a chair also does the job.
Always keep in mind – that the photographer should be the dormant element!
Advanced information: Avoid blurring through mirror lock-up/ mirror up (MLU/MUP) with SLR cameras
This hint is interesting for difficult light situations. The folding up of the mirror of the SLR camera equals in difficult light situation an earthquake. No matter how calm the camera was – the folding up of the mirror when pushing the trigger can lead to blurriness. Many SLR Cameras offer in the depths of their menu settings the possibilitiy to set the mirror lock-up. That way the mirror is folded up before the actual release process and cannot cause vibrations. When pushing the trigger the mirror first folds up and then in the next step the picture is taken.